Adventures
Important things to remember!
a. Be sure to disable joystick when you start flying adventures in observer mode.
b. Be sure to set idling power when you start flying the adventure flight.
c. Be sure not to tick the box for Download winds aloft with real-world weather.
(Create a flight -> Current Weather) If the box is checked, then weather does
not change to the weather set by the adventure program.
d. Be sure to calibrate your joystick once in a while (ref. FS2002 guide)
e. Flap setting and gear operation are automatically done. (by pilot not flying)
f. If yo exit the adventure program by pressing the ESC key, while spoken by somebody
(while .wav file are being played), this may cause the flaw in subsequent play of
the wave files. If this happens, relaunch the FS2002.
Adventures
01. Approach and landing (observer mode)
When an aircraft is airborne, you'll find yourself sitting in the jump seat of B767,
at approx 12DME on final. You are not supposed to do anything, but just observe how
they make an ILS approach and landing to RWY 17. It may be an idea to switch your
view to either SPOT view or TOWER view once in a while and see its landing from
outside of the plane. Remember to disable joystick.
02. Approach and landing (head wind)
Same scenario as 01, but you do it by yourself after having been told that "You
start flying from here". Joystick must be enabled.
Aircraft are not likely to be veered off the LOC course due to head wind condition,
however, close watch on the rate of descent and speed indicator are a must.
03. Approach and landing (cross wind)
Same scenario as 02, but there will be cross wind from your left. The nose of the
aircraft is kept aligned with the runway, while the drift is countered by applying
a slight bank to left, and line up the aircraft with direction of the runway by use
of rudder just before touch down. Practice followed by more practices can only
help you to master the cross wind landing technique.
04. Approach and landing (tail wind)
Same scenario as 02, but there will be tail wind for your landing. Be aware that a
tail wind will significantly increase the landing distance due to an increase in
ground speed of the aircraft as it approaches and touches down. It is, therefore,
quite clear for anyone to understand that the tail wind landing would become a big
issue when there is only a short runway available.
05. Approach and landing (rough wind)
Same scenario as 02, but there will be rough air condition in approach area.
The first step toward achieving good landing in turbulent situation is to keep
airspeed consistent during the approach. What does rough air mean ? In short,
it means that the air is very unstable in a given air mass. More precisely,
it can be expressed by the words, such as up and downwash. Your competency for
an adequate aircraft control is demanded for an approach in rough air, because
of the difficulty in keeping a desired airspeed.
06. Approach and landing (at dusk)
Same scenario as 02, but this time you do it at dusk. Enjoy your approach and
landing, by viewing the beautiful scenery spread out before your eyes.
07. Approach and landing (one engine failure)
Either of two engines will be failed during an approach. Engine to be failed
are chosen at random. When one engine is stopped, the difference of thrust
between good and bad engine will produce yaw. An aircraft will yaw toward the
engine producing the least amount of thrust. The main flight control for
correcting yaw is the rudder. The correct rudder to apply is the side of good
engine. Remember the memory aid, "step on the good engine". Flap setting of
5 degree are used for landing with one engine failure, and the approach speed
would be around 150kt. Why not with full flaps ? Because, more drag caused by
the full flaps requires more power on the operative engine. The greater the
differential of thrust, the greater the degree of yaw. In order to reduce yaw,
we use flap 5 for the lesser amount of thrust from the good engine.
08. Approach and landing (nose gear trouble)
We shall be landing with nose gear in trouble. No matter how we try hard, we
have difficulty in lowering and locking the nose gear. This is a very rare
case in a real life, as cockpit crew are in possession of various option to
deal with this nature of trouble.
In this adventure, however, we would dare to attempt the landing with the Nose
Gear not lowered and not locked. We aim at controlled crash landing, so that
the speed shall be as slow as possible and slight pitch up attitude be kept by
the elevator when the main gears come in contact with the runway. As lift
decreases (with the speed reduction), the nose of an airplane eventually comes
in touch with the ground. Good luck !
09. Go around (observer mode)
You are not supposed to do anything, but just watch how they perform a Go
Around from an approach to RWY 17. Go around operation must be practiced
to the great extent, because go-around is nothing uncommon in a real life,
especially in adverse weather condition.
10. Go around
Same scenario as 09, but you do it by yourself.
11. Touch and Go RWY 17 (observer mode)
You are not supposed to do anything, but just observe how they execute
Touch and Go operation on RWY 17.
12. Touch and Go RWY 17
Same scenario as 11, but you do it by yourself. Bear in mind that upon touch
down, you must keep idling power until flap is set to 5 degree for take off.
Touch down point is an essential to secure room for subsequent GO operation.
13. Take off from RWY 17 (observer mode)
You are not supposed to do anything, but just observe how they take off from
RWY 17.
14. Take off from RWY 17
Same scenario as 13, except surface wind, but you do it by yourself.
15. Take off from RWY 17 (one engine failure)
Engine failure would occur during takeoff. When it happens, your instantaneous
decision is a must for the survival. Decision must be made whether to take off
or not, depends upon the speed at the moment of engine failure.
The situation of this adventure varies at random. The left engine failed this
time, but you never know which one is to fail at next. Similarly, the engine
failure occurred before reaching V1 this time, but no one can predict that the
next occurrence would either be before or after V1. Rule is that you shall abort
take off when failure occurs before you reach the speed of V1. Because, it would
be possible for you to bring the aircraft to halt on the remained part of runway.
If engine is failed after the speed of V1, then you must continue take off with
one operative engine. Because, you can't stop the aircraft before you reach the
end of remained runway.
"Step on the good engine" is the good memory aid. When engine is failed, use
rudder to correct the aircraft yaw. Always, apply rudder to the same side as
the running engine.
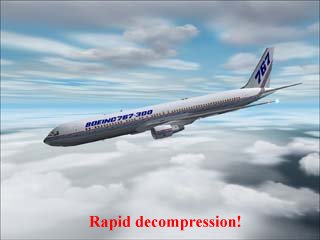
16. Emergency descent
Emergency descent to 10000ft, due to rapid decompression. This kind of emergency
training is, in a real life, performed with full motion flight simulator. It has
been in use for the pilot training in a real life. It is so precisely manufactured
and it is, therefore, capable of doing most of training flight and check flight of
real-life pilots.
Emergency Descent is featured in this adventure. The destruction of the door caused
the rapid decompression. You shall disengage the A/P and A/T, and then start descent
from the FL290. While doing the emergency descent, you can deploy the spoiler fully,
so as not to exceed the speed limit. Over speed may cause serious damage to the plane
structure, which may result in disintegration of the aircraft. Careful control of the
speed by pitch adjustment is, therefore, vital to the success for the descent to safe
altitude. If you could descend to 10.000ft in less than 60 seconds, you pass the exam.
17. VOR/DME/ILS approach and landing, RORS RW17 (observer mode)>
You are not supposed to do anything, but just observe how they make an approach to
RWY 17 via VOR/DME/ILS approach.
18. VOR/DME/ILS approach and landing, RORS RW17
Same scenario as 17, above, but you do it by yourself. The procedure shall be
previewed.
19. VOR/ILS approach and landing, RJCM RW18 (observer mode)
You are not supposed to do anything, but just observe how they make an approach to
RW 18 at Memanbetsu Airport via VOR/ILS Approach. This scenario is added for you to
enjoy landing at snow covered airport under the snowy weather.
20. VOR/ILS approach and landing, RJCM RW18
Same scenario as 19, but you do it by yourself. The procedure shall be previewed.
21. ILS and Traffic Pattern training at Shimojishima
This scenario is provided for the pilot ranked at intermediate level or higher. This
adventure program is written based on the actual training curriculum of the flight
training center of an airlines. In other words, this training are the same as that of
what is actually performed by the real airline pilot in real life. At the end of the
flight, the pilot performance are rated and scores are given.
Traffic Circuit Training consists of the three pattern. These are, ILS traffic, Normal
traffic and Minimum Traffic. (see Traffic Patten Diagram)
a) ILS Traffic.
After take off, climb to 3000ft with VS of 3000ft to 4000ft. Make right turn when
instructed with bank angle 30deg. Maintain airspeed of 200kt or less at altitude
of 3000ft or lower in this pattern. Adjust airspeed unless otherwise instructed.
Approach will be made on ILS.
b) Normal Traffic.
After touch down, you'll be instructed to "set take off power", when flap 15 is
set. You'll fly with airspeed of 180kt, altitude 1500ft and flap 15. When right
turn to 080 (base turn) is achieved, you start descending for visual approach to
RWY 17. Use Right Front view, or descend in referring to the GS.
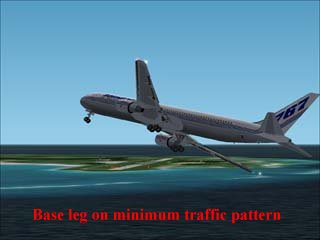
c) Minimum Traffic.
After touch down, you'll be instructed to "set take off power", when flap 20 is
set. You'll fly with airspeed of 145kt, altitude 600ft and flap 20. Adjust speed
and rate of climb with utmost caution to fly SLOW and LOW! This pattern flight is
really something worthwhile for all sim-pilots to make a challenge.
After successful landing, decelerate the aircraft speed to 30kt or less. Proceed via
T2, parallel taxiway to the ramp for parking. (Parking position is not specifically
designated. Park your plane on ramp at your discretion). Then, set parking brake and
cut off engines. Your performance are rated, and scores are given.
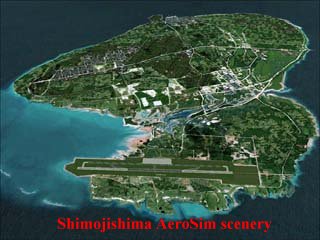
Scenery
Shimojishima Airport  RORS (ICAO 4-ltr) SHI (IATA 3-ltr)

Shimojishima Island is one of the island in the Nansei Islands and located at about
300km southwest of the Okinawa Main Isl. It is situated just beside the Miyako Isl
and Irabu Isl. Throughout the year, people living there can enjoy life with warm
climate and beauty of the sea of a coral reef shining in emerald green. The airport
which can be exclusively used by airline pilots for their training is out there.

In the nineteen sixties, large quantities upbringing of civil aviation pilot of jet
aircraft became urgent matter by growing demands of air transport. The construction
project of full-scale training airport for civil aviation was thus begun.

In July of 1979, the newly constructed training airport was brought into operation.
A little while later, the airport was linked with other airports by scheduled air
service, but was suspended due to insufficient traveller and freight to be transported.
Airport Data
Class
| 3rd class aerodrome
|
Authority
| Okinawa preferctural government
|
Address
| Irabu Town, Miyako gun, Okinawa
|
Coordinate
| N 24 49 23 E 125 08 45
|
Elevation
| 25ft (7,58m)
|
Runway length
| 3000m x 60m
|
OPS HR
| 07:30-20:30 (JST) 22:30-11:30 (UTC)
|
Back
Copyright(C) 2002 AeroSim Co., Ltd. All rights reserved.